According to the real site, add models and particles to a scene to simulate and view site status in real time.
Adding Scene
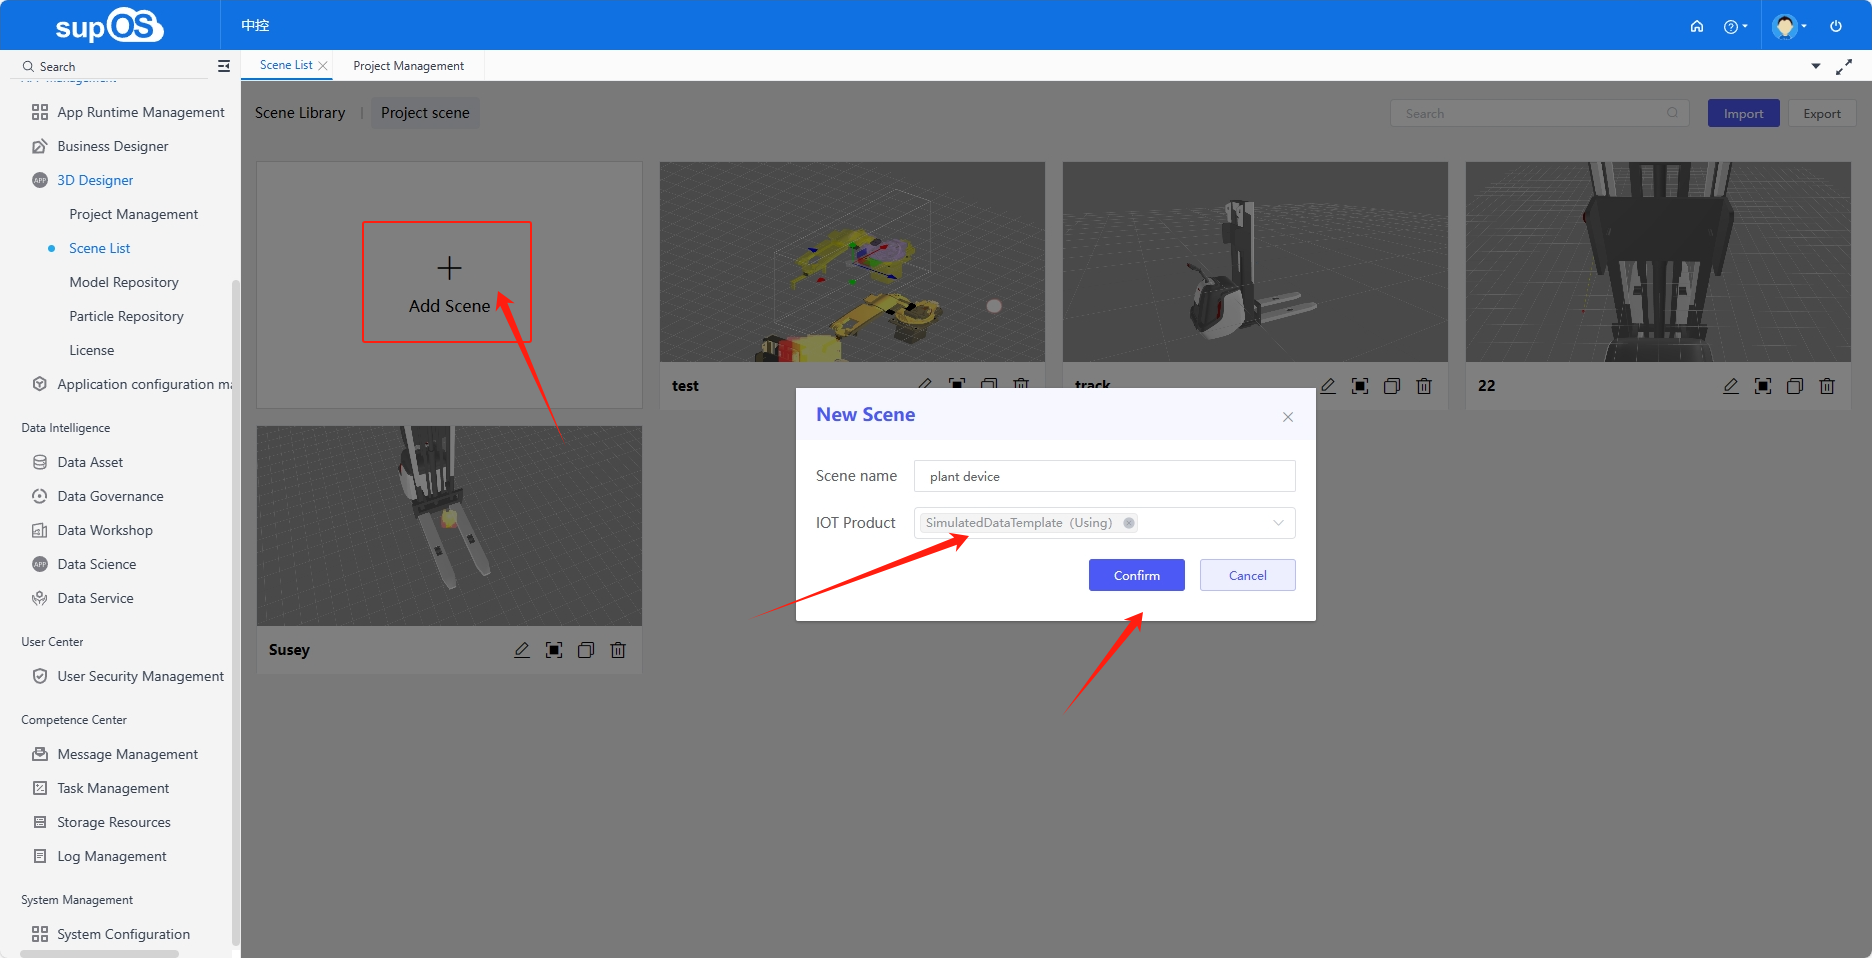
- Select APP Management > 3D Designer > Scene List, and then click Add Scene.
- Name the scene, select IOT products (entity template from supOS) with bound models in Project Management, and then click Confirm.info
Bound models can be directly imported through the template, and you can also import other models to the scene.
Editing Scene
Select a scene, and click  to start editing.
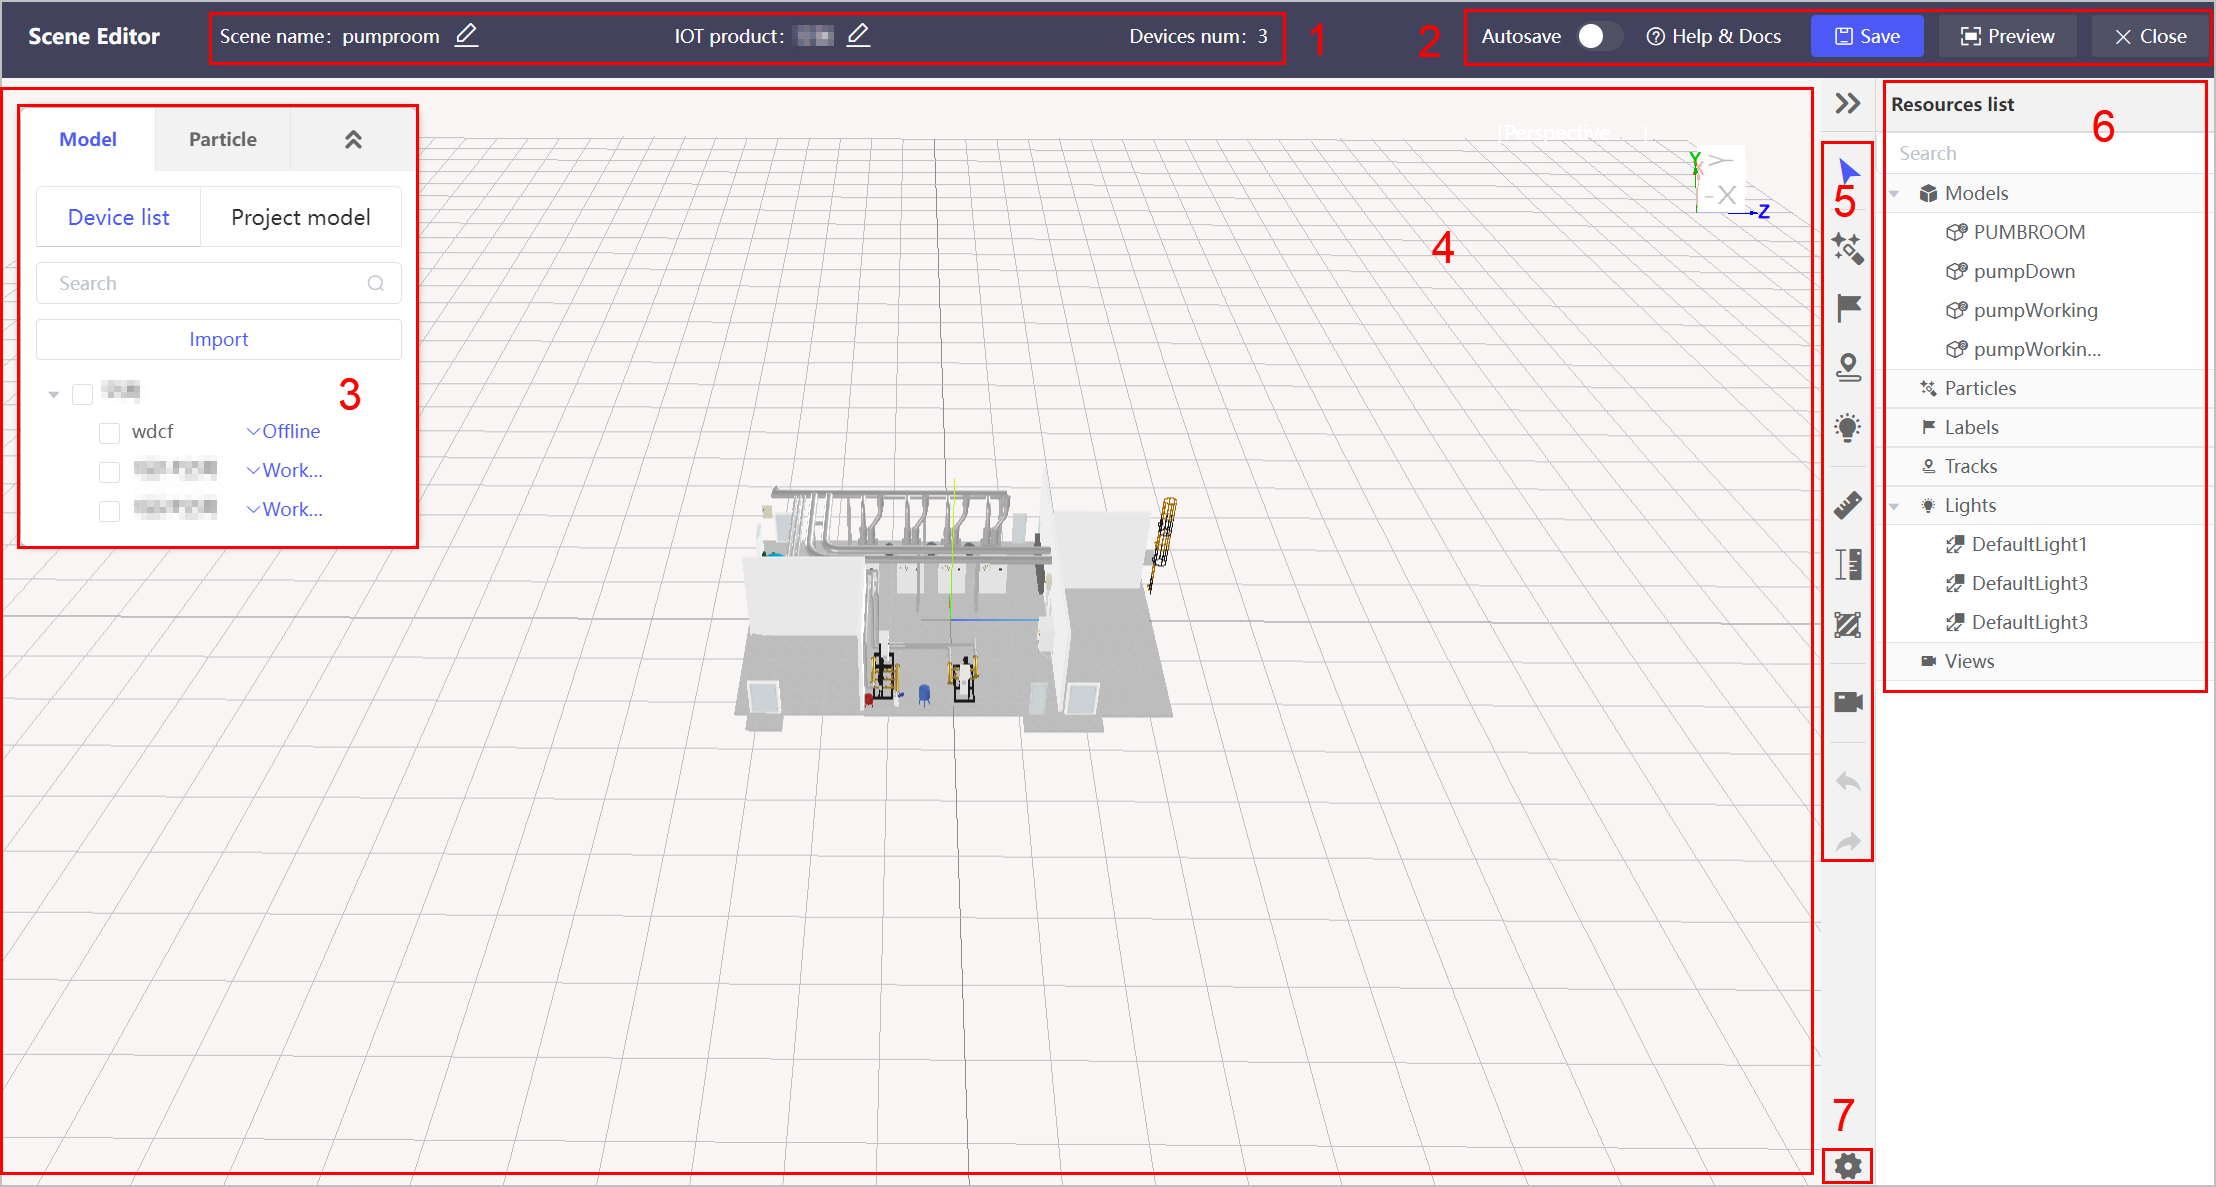
| No. | Function | Description |
|---|---|---|
| 1 | Scene Info | The basic information of the scene, including scene name, the associated template and bound models. |
| 2 | Operations | Basic operations of the scene, such as save, preview and close the scene, and view documentation. |
| 3 | Model List | Displays the models bound with the selected template, and available models and particles for import. |
| 4 | Canvas | Displays the scene with all the effects. |
| 5 | Tool Bar | Tools for editing the scene effect. |
| 6 | Tool List | A list of all effects added in the scene. |
| 7 | Settings | Scene settings including style, oreview effect and popup. |
Adding Models and Particles
- Select a device under Model > Device list, and select the bound animation to be displayed on the scene.
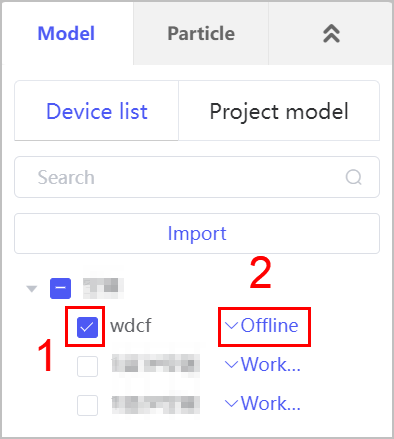
- Click Import.tip
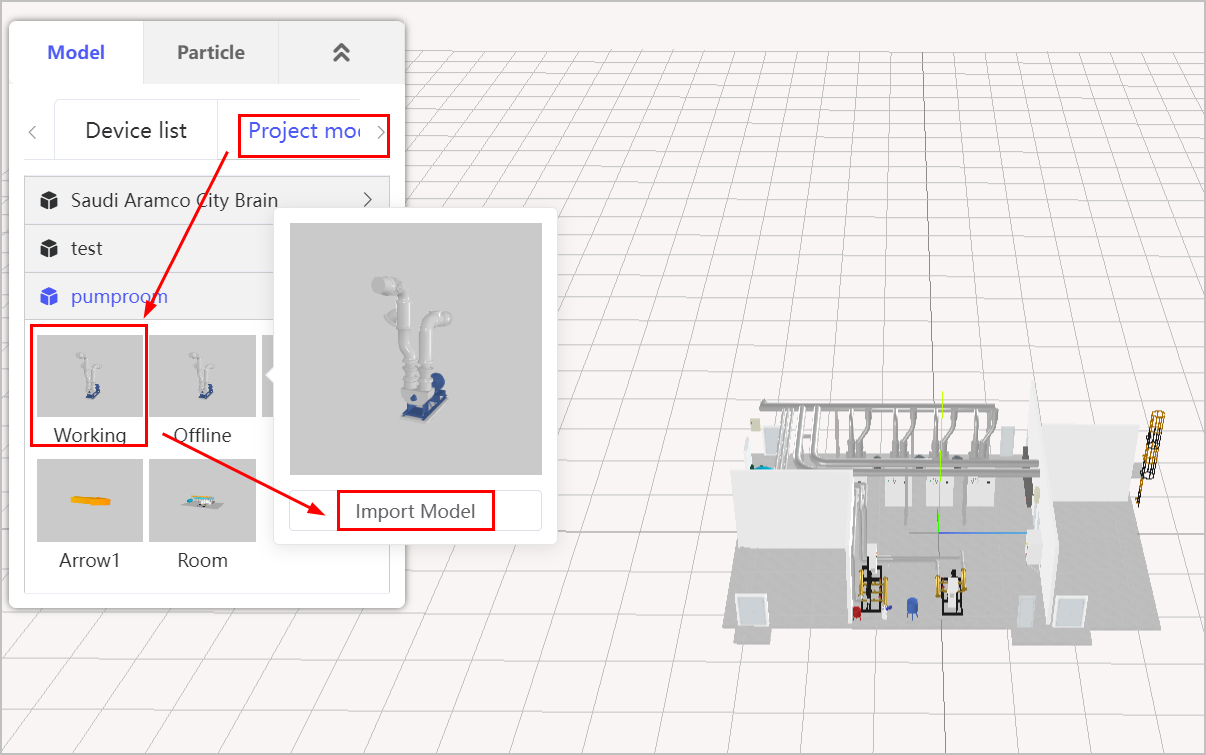
Click Model > Project model, you can select models that are not bound with the selected template and add them to the scene.
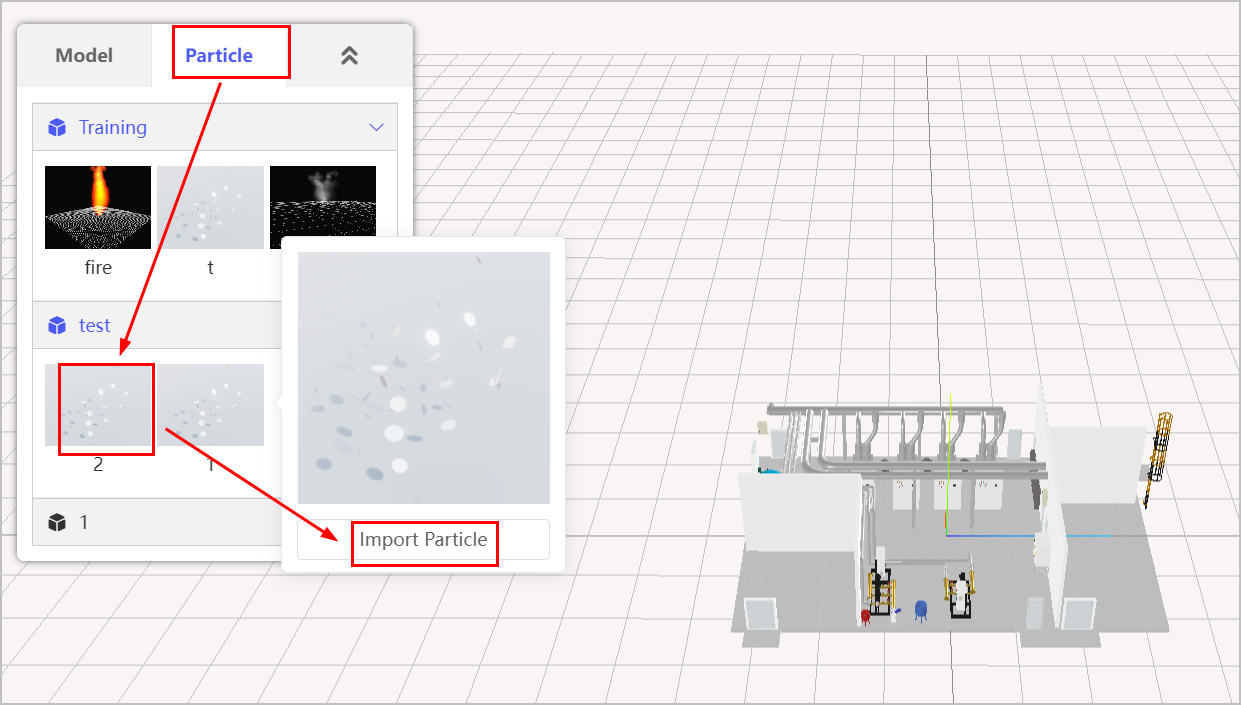
- Under Particle, select a particle and then click Import Particle to add particles to the scene.
Editing Model
- Select a model from the list on the right side, or click the model on the scene to start editing.
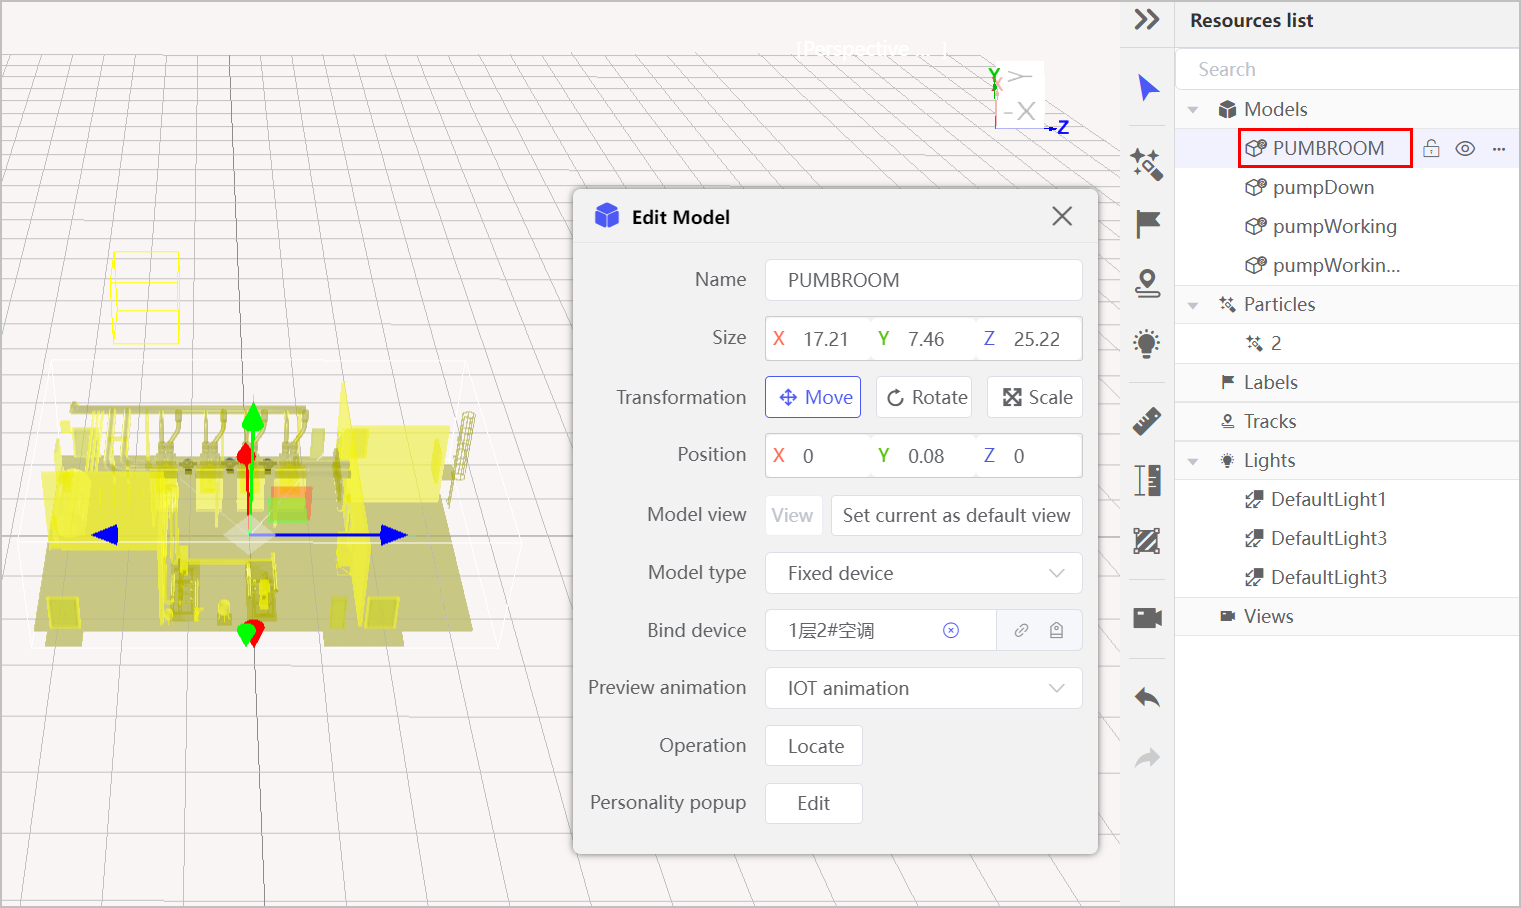
- Set the name of the model, and then next to Tranformation, change the position, direction and size of the model.
- Click Set current as default view next to Model view to add a default viewpoint of the model.
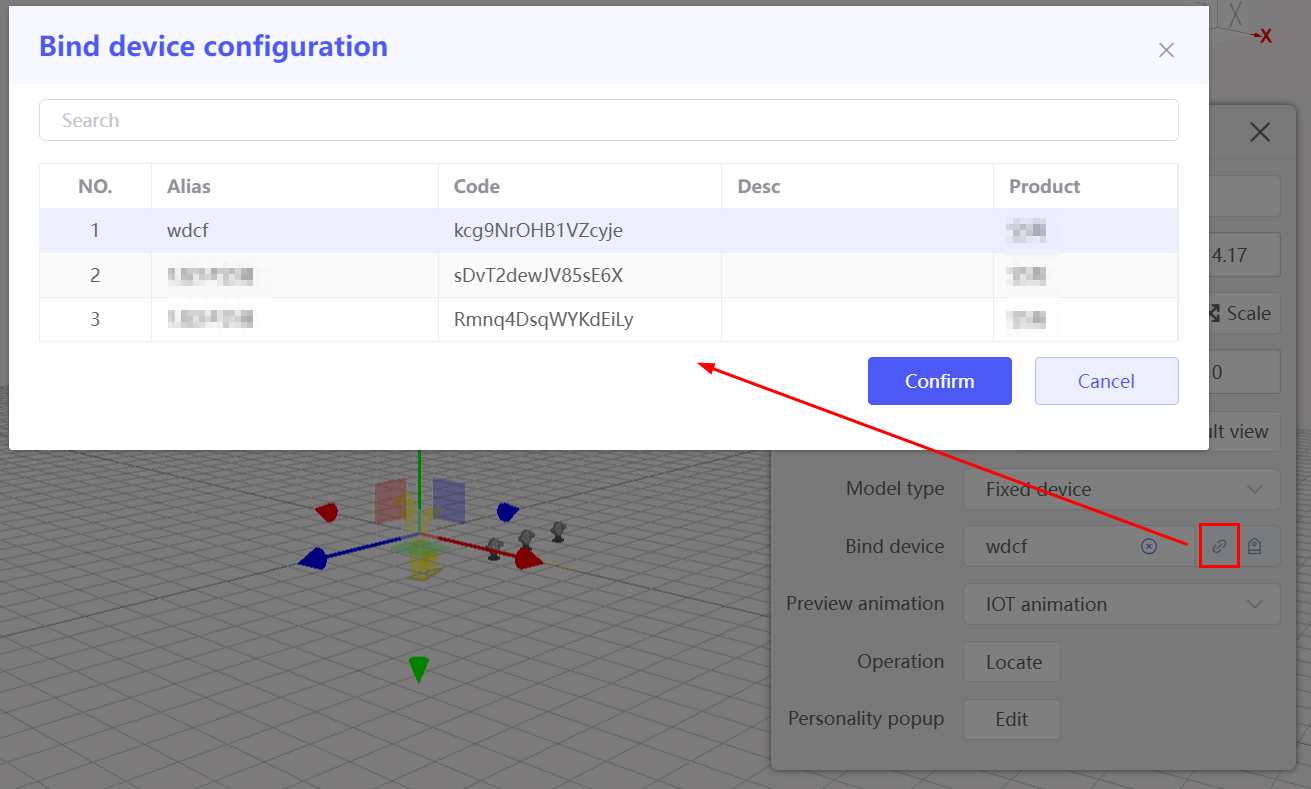
- Select a model type, and click
 to bind a device with the model.
- Mobile Device: Import the location data at the backend, set mobile device and bind to the scene, so the model goes along the set route.
- Fixed device: Templates that are bound with models.tip
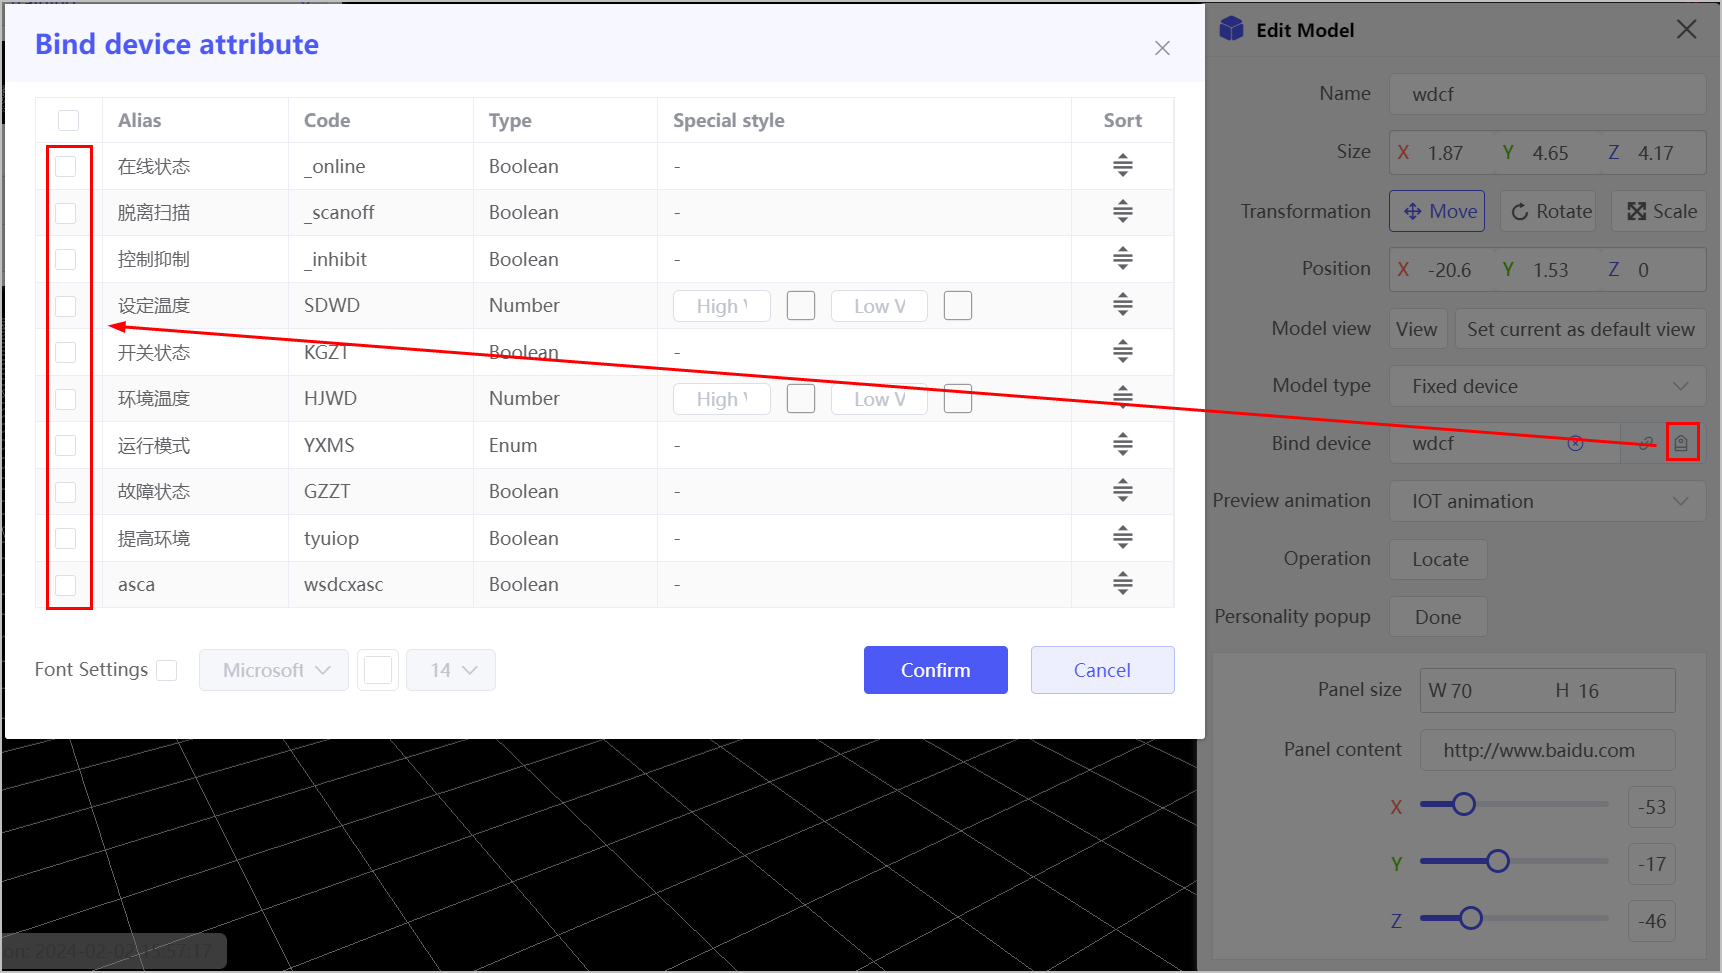
Click
 to select attributes to be displayed on the popup window.
- Select Preview animation.
- When bound with devices, the only option is IOT animation and animations are triggered by data.
- When no devices is bound, you can select animations configured with the model.
- (optional) Click Locate next to Operation to return to the default view of the scene.
- Click Edit next to Personality popup, and edit the size and position of the window.
- Select attributes to be displayed on the popup window from the bound device.
- Set the Panel content, for example, https://www.google.com, and the page content is displayed on the popup window.
Editing Particle
Select a particle imported to the scene, and edit the particle name.
Select a type next to Transform, and drag on the canvas to change the position, direction and size of the particle.
tipChange the value of Position, Rotate, and Scale to edit the particle, and scale can only be edited in the same ratio.
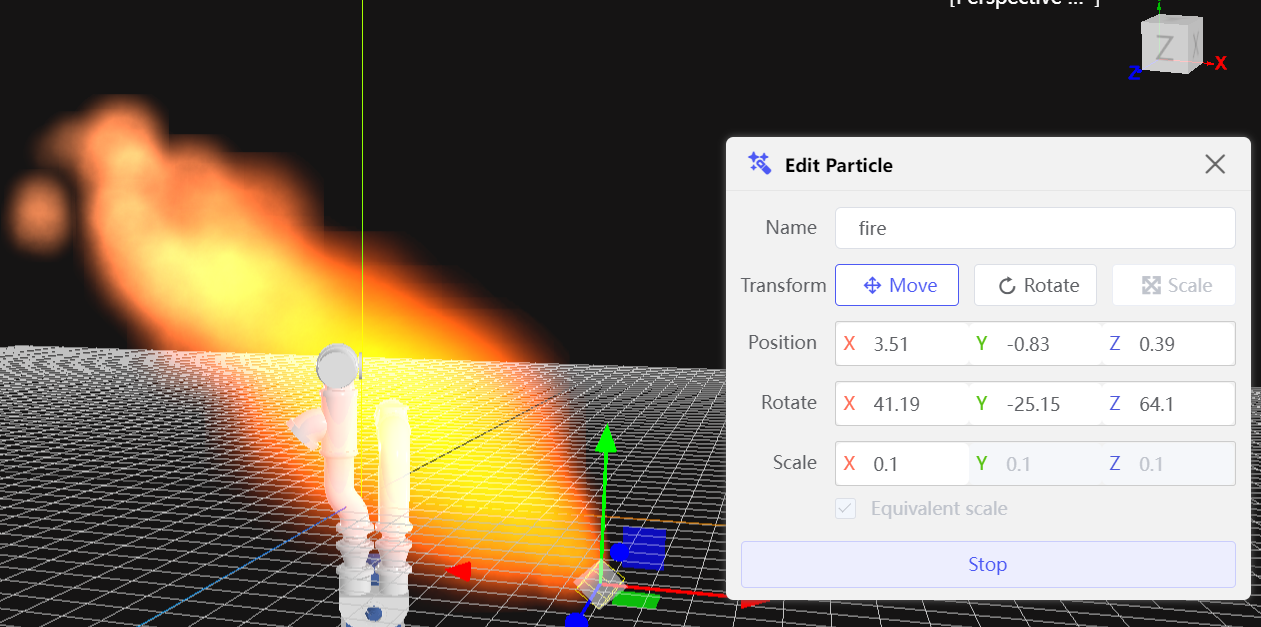
Click Preview and save it.
Adding Label
- Click
 to add a label in the scene.
 - Enter the content of the label, and then click Upload next to Icon to add an SVG image in the label.
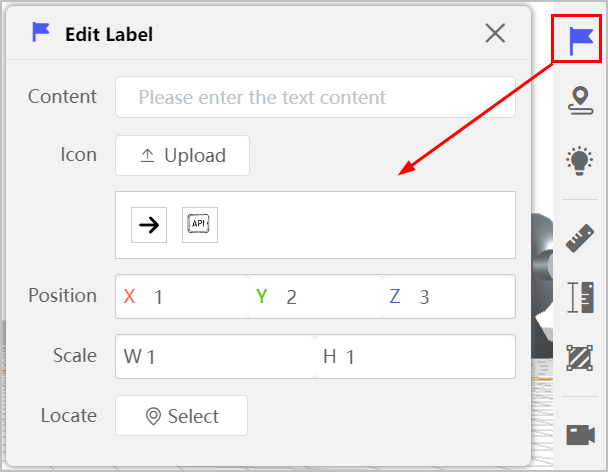
- Select the uploaded image for it to show on the canvas, and the Click Select, and then click on the canvas to set the label location.
- Change Position and Scale value to reach the desired effect.
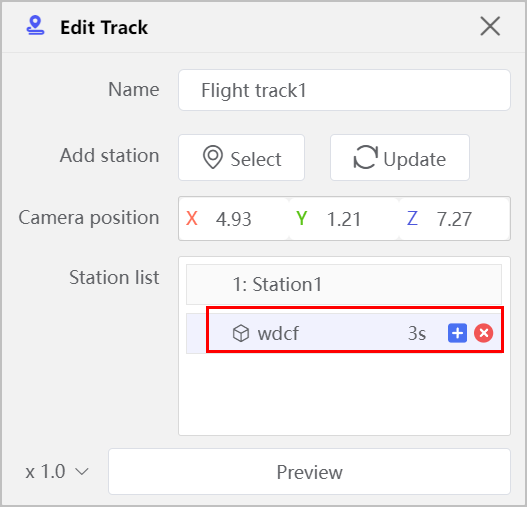
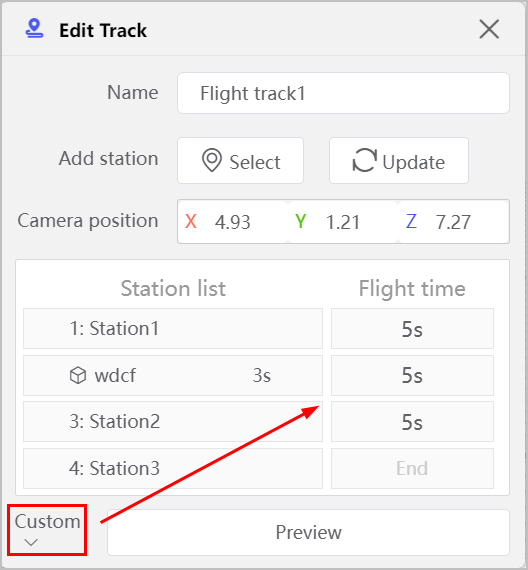
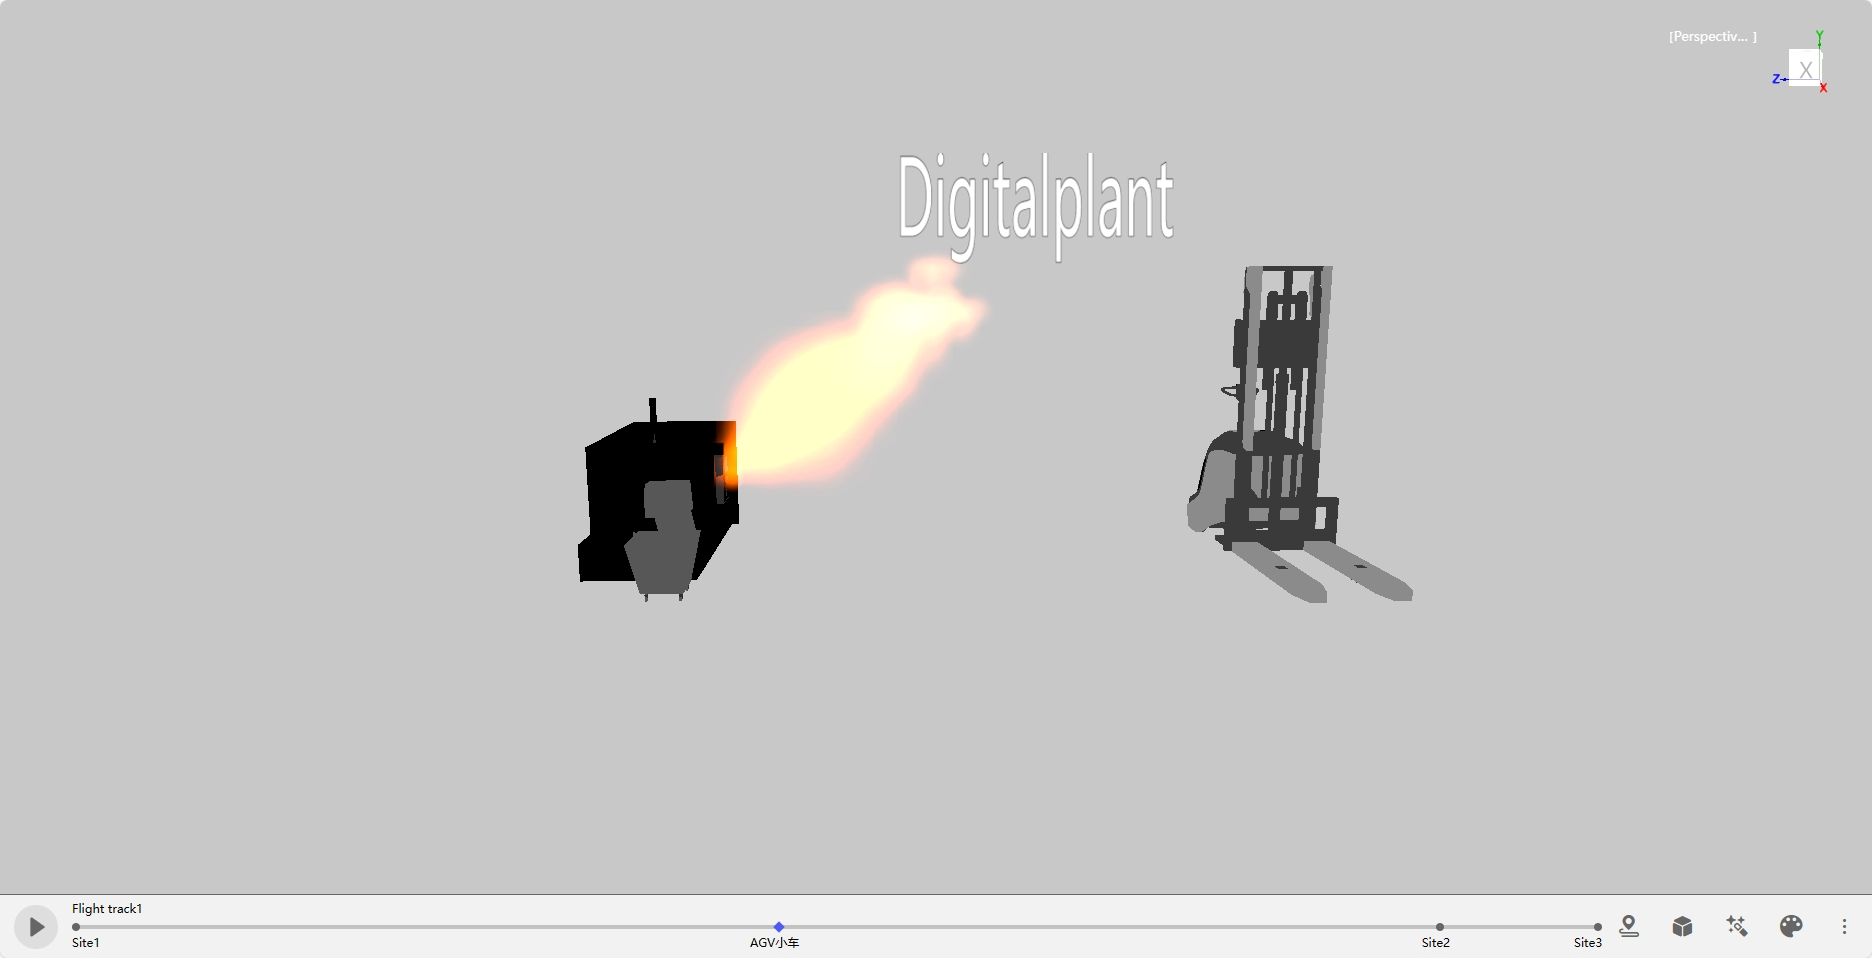
Adding Track
Track means to add perspective changes in the scene to get a comprehensive view.
- Click
 to add a track.
 - Name the track, and then click Select to set the current perspective as the first view.
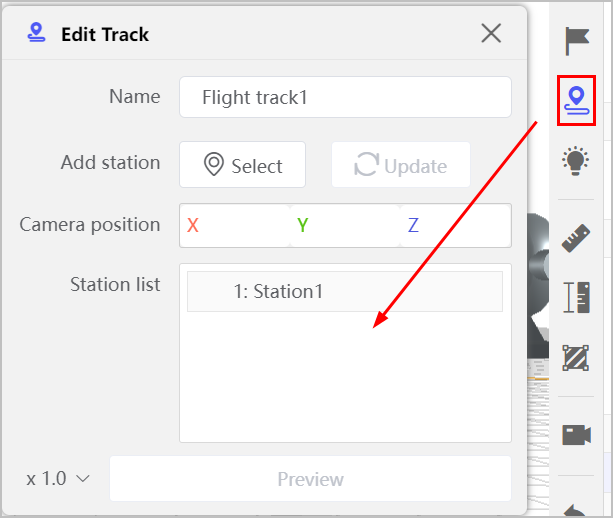
- Change the viewpoint and click Select again to add more views in the track. :::TIP
- Select the added view, change the view by editing the value next to Camera position.
- Select the added view, change the view and click Update to change the view. :::
- Select an added view, and then click
 , click the model that is configured with default view, to add a pause duration during the track.tip
Set the duration of the view to achieve a detailed effect.
- Click
 to set the view speed of the track.
- x 0.5/1.0/2.0: Select a value to set the view speed.
- Custom: Customize the duration of each view point.
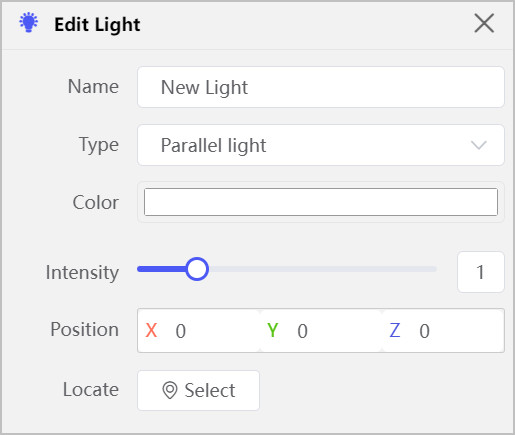
Designing Light
- Click
 to add lights in the scene.
 - Select light type to Parallel or Point.
- Parallel light: Rays of the light are parallel to each other.
- Click Select.
- Click on the canvas to put the light.
- Point light: Rays of the light radiate to all directions from a single point.
- Click Select, and then click on the canvas to put the light.
- Set the illuminant range of the light next to Distance.
- Set the Decay value of the light. The bigger the value, the faster the light illumance reduces.
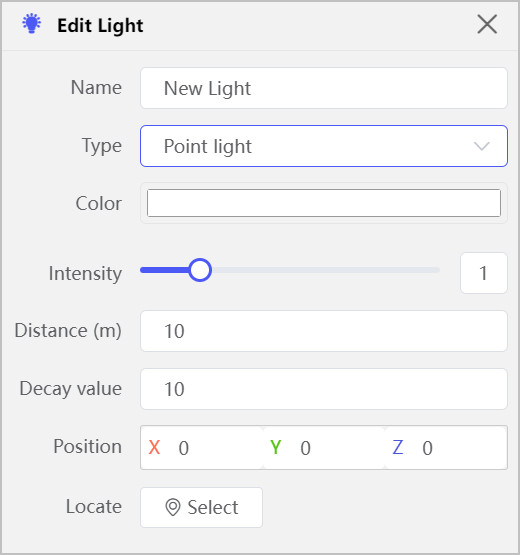
You can drag or edit the value of Position to edit the light source location.
- Select the light color, and drag the Intensity bar to edit color intensity.
- Click Save.
Changing Views
Display selected models and labels in a view.
- Click
 to create a view.
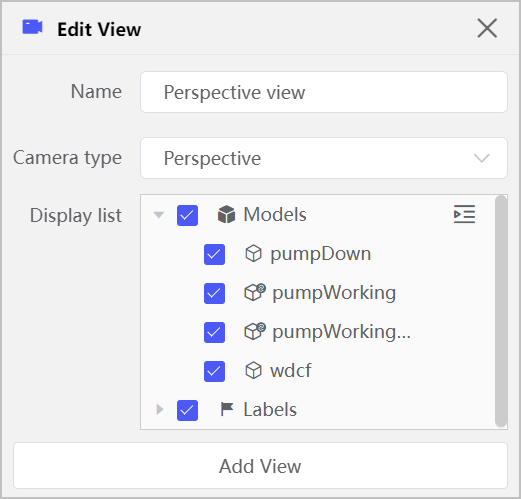
- Set Camera type.
- Perspective camera: Creates a sense of depth and distance in the scene.
- Parallel camera: Maintains plane effect in viewing.
- Next to Display list, select models and labels to be displayed in the view, and then click Add View.tip
CHange the Display list items, and then click Update view to update.
- Click Save.
Measuring 3D Display
 : Click on the scene and click again to select another point, double-click to finish and the distance between these 2 points is displayed.
 : Click on the scene and click again to select another point, double-click to finish and the height difference between these 2 points is displayed.
 : Draw on the scene, and double-click to finish drawing and the drawing area is displayed.
Right-click the model in the scene to bind device to, or Copy, Hide, and Delete the model.
Previewing the Scene
Save all the settings and click Preview at the upper-right corner to preview the scene.
- Click
 to preview the track.
 - Click
 and
and  to check the models and particles.
 - Click
 to change display color.
 - Click
 to perform operations such as keyboard control, automatic rotation, outline when hovering over and measuring.